Table of Content
General tips
Introduction – Take photos like a pro
Use natural lighting for product photos
Shoot photos on a mobile phone like a pro
Use camera angles to your advantage
Edit your product photos
Use apps for product photos
Source 1:
https://support.permission.io/hc/en-us/articles/360058989193-KYC-Photo-Requirements#:~:text=It%20is%20recommended%20that%20the,%2D80%25%20of%20the%20image.&text=Make%20sure%20the%20space%20around,%2D80%25%20of%20the%20image.&text=The%20document%20should%20be%20in%20clear%20contrast%20to%20the%20background.
Source 2:
https://fstoppers.com/product/portable-and-inexpensive-seamless-background-system-2974
I. General Tips
The following are general tips on how to capture the best product photos:
Equipment Type: Use a standalone camera or mobile instead of PC, and ensure that the camera / phone is steady.
Use of camera accessory: Utilise a Tripod or selfie stick (with stabilizing legs): Using a tripod helps to stabilise the camera or phone as well as help you maintain consistency and focus. If you do not have a tripod, you may place your camera on a stack of books, for instance, which ensures that the camera doesn’t move when taking a shot.
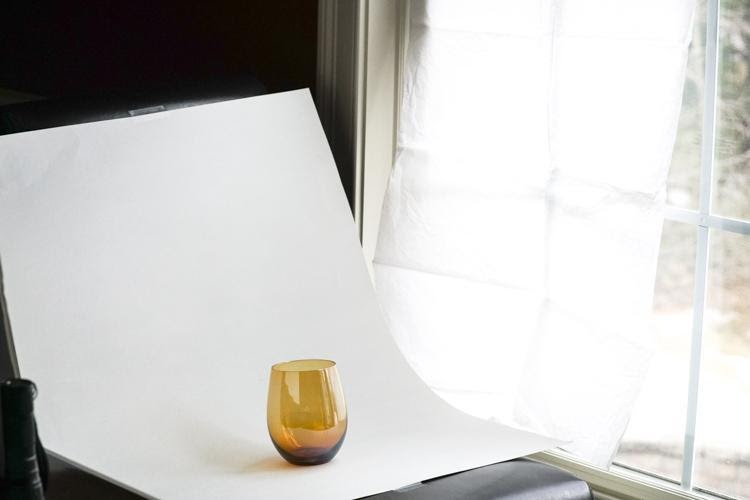
Backdrop/Background: A good background set-up is crucial for the overall quality of your product images. Take the photo against a plain background (not a patterned or heavily coloured background).
We strongly encourage the use of a white backdrop, but any light-colured can work for the right product. It is crucial not to have any clutter in the backdrop/background – you don’t want anything else to pull the attention away from the product.
Use a professional sweep-stand. Alternatively ,you can create a chair-mounted sweep-stand for smaller products by simply clipping craft paper on top of it. For more significant products, you can tape a long roll of craft paper on the wall and let it fall to the floor naturally. Goodbye, horizontal lines!
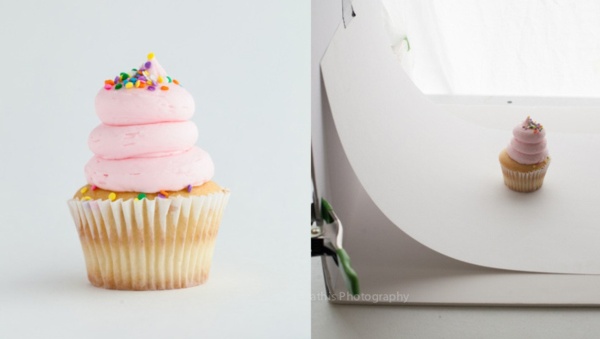
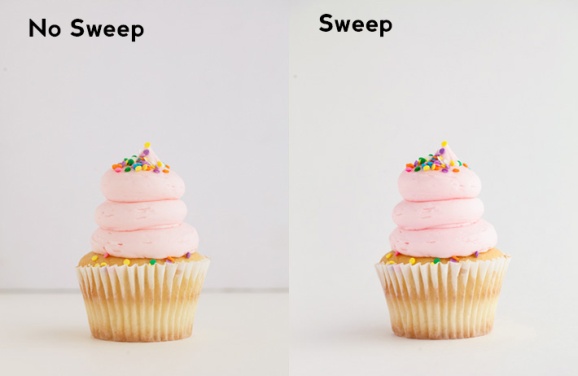
Photo Credit: https://fstoppers.com/product/portable-and-inexpensive-seamless-background-system-2974

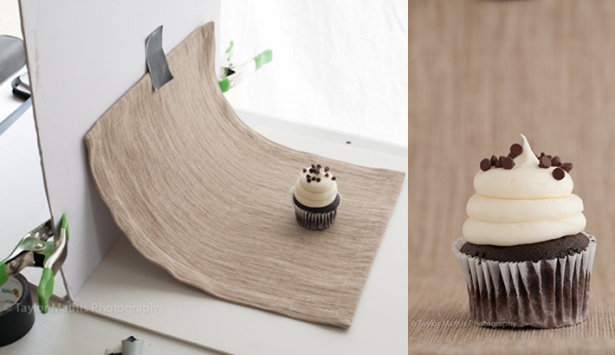
Photo Credit: https://fstoppers.com/product/portable-and-inexpensive-seamless-background-system-2974
Resolution of the image: Use a camera with a resolution of at least Full HD (1920×1080) and autofocus to capture the product image.
Good lighting: If the image is too dark or too bright, this might distort the product image quality so ensure optimum / ambient lighting to achieve better image quality.
Contrast: The product should be in clear contrast to the background. A light-coloured product on a light background, as well as a dark-coloured document on a dark background, might not be recognized.
Avoid reflections: Avoid glares and reflections when capturing product images as these lead to poor product images.
Focus and sharpness: Make sure the product image is clear without any form of blurring.
Margins (too big): Ensure that the space around the product does not take up more than 20-30% of the image. It is recommended that the product takes up 70-80% of the image.
Extraneous objects: Ensure that your hands, fingers or other objects do not appear within the product image.
Image format: Upload a photo in JPEG format at least 900px × 600px.
Product size / proportion: Do not distort the real proportion of a product in any way.
Product’s True Colour: Do not distort the real product colour in any way. Make sure the colours stay as they are. You can tone them a bit to ensure they perfectly match a real-life product, but that’s it.
Ensure that you view your photos on different devices after editing them to make sure the colours are consistent.
II. Introduction – Take photos like a pro
The basics of taking product photos with a smartphone involves the use of a white background and natural light.
In order to take top quality product photos with your smartphone, we discuss in this section how to build a good photo set up for your products photos.
III. Use natural lighting for product photos
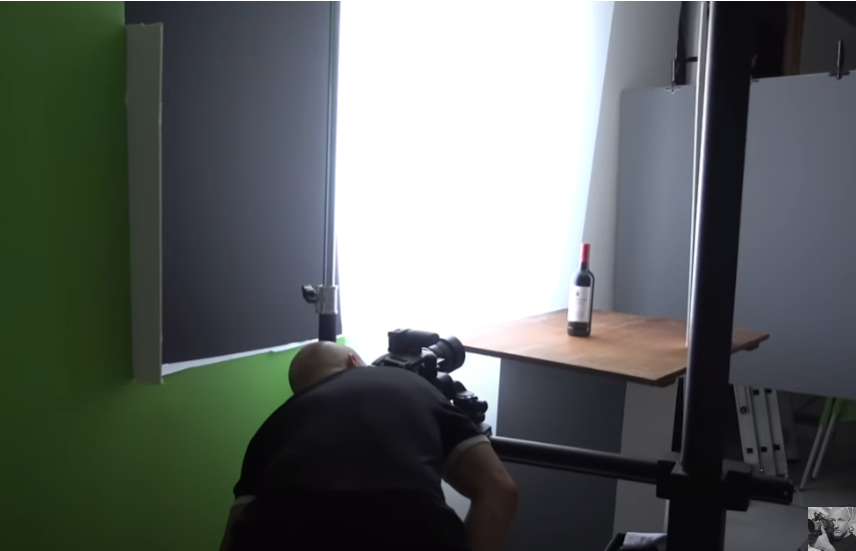
The use of a well-lit room or area with natural lighting helps in bringing your product to life.
Ensure that there is a very good lighting in the room by opening large windows and doors, roof window or skylight. Avoid using harsh, non-natural coloured lighting from amber or yellow bulbs or fluorescent tube light bulb.
Product Photography at Home Using Natural light
Photo Credit: https://www.youtube.com/watch?v=qy4I7y77gTE
Place your product photo setup close to a window and aim for 90 degrees to the right or left of your setup. Aim to start your photoshoot at the brightest time of day and if necessary in case when the sun is too bright), you can always use a diffuser sheet to soften the light.
IV. Shoot photos on a mobile phone like a pro
If you are unable to get a digital single-lens reflex (DLSR) camera, you may be able to use a smartphone camera with very high megapixel count.
You can use a smartphone with a camera with the latest and best megapixel available on the market, possibly one with 12 megapixel camera or better. Smartphones in this group include but not limited to:
Google Pixel 2 or newer
Samsung Galaxy S8 or newer
Huawei P20 Pro or newer
Apple iPhone 8 or newer
Realme 10 Pro Plus
OnePlus 10 Pro
Xiaomi Redmi Note 11 Pro or newer
V. Use camera angles to your advantage
You may be able to play intelligently an inexpensively with various angles to get the best vantage point for your product photos using either a tripod stand or selfie stick (with stabilizing legs).
Full tripods, mini tripods or selfie sticks (with stabilizing legs) are a good investment with high payoff as these reduce camera shake and help standardize photo angles and style for your product line.


Example of a mini tripod and selfie stick (with stabilizing legs)
You can use the tripod or selfie to capture any of the following five perfect camera angles in your product photo shoot:
Eye level – this shows the product as you’d see it looking straight on.
High angle – this shows the product as if you’re looking down at it from an angle.
Low angle – this shows the product as if you’re looking up at it from the floor.
Bird’s eye – this shows the product as if you’re standing over it.
Slanted – this shows the product from one side.
V
VI. Edit your product photos
Before shooting your product images, you need to lock certain basic settings on your phone, these include:
Image Storage: Ensure that your camera or phone settings has image backup storage for your images.
Set up the camera or phone white balance according to the light temperature in the room, by using your phone’s Auto white balance (AWB) option.
Check your exposure: Click on the phone’s ‘exposure’ button, then touch your product so that the camera knows to expose it.
Keep everything in focus. Click on your phone’s ‘focus’ button, then touch your product so that your phone’s camera knows to properly focus on the product.
Lock the camera settings: After adjusting the phone camera settings, tap each one again to lock the settings in place. This will stop the camera from automatically adjusting the settings while you are taking shots.
Once the phone camera settings are locked, you’re ready to start shooting great product photos. After taking the first shot, scrutinise the image to see if it needs to be brightened or darkened in order to achieve a proper exposure.
VII. Use apps for product photos
With advance in smartphones technologies in the last few years, it is now really easy to edit photos on your smartphone.
We provide below simple steps to help you edit product photos on your smartphones:
Download a photography editing app of choice from App Store or Google Play Store on your phone. Examples include Snapseed, Lightroom, Adobe Photoshop Express, Canva, VSCO, Prisma Photo Editor, PicsArt Photo Studio, Foodie. Alternatively, download photo editing software on laptops or desktops platforms.
Load the product image you intend to edit on the phone editing app and tweak the image to your liking to how you want it to look in your online store. The edits may include brightness, contrast, sharpness, highlights/shadows, and white balance. Do not use filters, borders, tints, and oversaturation.
Save presets: Save the settings as a preset after editing the first photo. This will help to speed up the edit of other products images by applying the same adjustments from the first photo edit. After applying the preset to each subsequent image, check that each image is still as close to the real life image after applying the preset.
Apply a neutral colour to the background. A white or grey layer background to act as a contrast to the product brings the product alive. Remove blemishes or creases from the produst background by replacing the background with a white layer. Since a white background was used when taking the product photo, it’ll be easier to isolate the product and add a new white layer to the background.
How to Capture high quality Clothing Photos
Table of Content
Required photo equipment
Guide to a good clothing photos
How to improving clothing photos
Source : https://www.shopify.com/blog/clothing-photography
Required photo equipment
Equipment required for clothing photos are exactly the same a t hose required for other product photos, including camera, tripod stand or selfie stick (with stabilizing legs), natural light source (or artificial lighting such as softbox or LED ring light / ringlight).
In addition to the above, the following are required to
Foam boards: In order to avoid shadows when taking clothing photos, it is advisable to place a white foam board to soften and reflect light back into the shadow.
Backdrop: A backdrop is very essential for all products photos, including clothing photos. This could be in form of a paper white sweep or a poster board.
Ensure that the paper sweep or poster board is clean at all times and they should be replaced if it becomes dirty.
Mannequin / model: This is a nice-to-have rather than a must-have when taking clothing photos. You may obtain a used one rather buying a new one. Alternatively, you may hang the clothing on a hanger from the ceiling, along with a good backdrop such as paper white sweep or poster board (as mentioned above).
II. Guide to a good clothing photos
Use the following simple steps to guide you through taking awesome clothing photos:
Prepare the apparel, remove any stains and iron our any wrinkles
Set up your photo equipment, backdrop, paper white sweep, lighting, mannequin, etc.
Position lighting (e.g. softbox or LED ring light) appropriately to soften any shadow from the apparel
Style it by asking an employee, friend or family member to model the clothing for you
Select the best camera settings
Take several photos from various angles and select the best
Prepare the photos for the web upload: This steps may include cropping, digitally removing the background (if required), adjusting white balance, etc.
How to improving clothing photos
Acquire necessary skills by seeking the help of people with experience and learning from them. Also avail yourself of free resources from various sources such as YouTube.